Hibiscus Flower Hot Pepper Jelly with Homemade Pectin

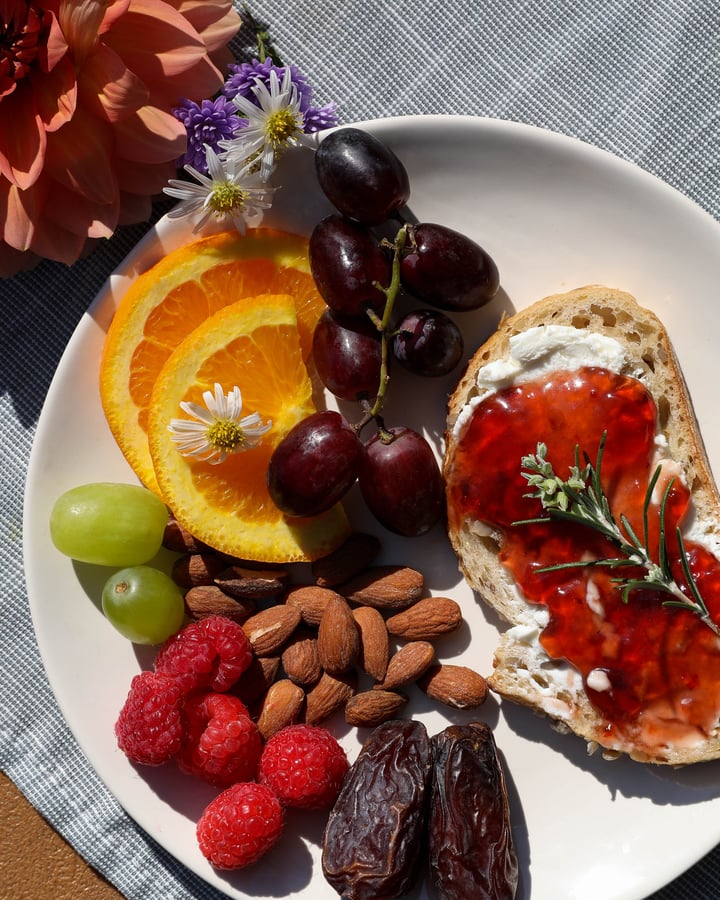
Hibiscus hot pepper jelly with cream cheese on baguette surrounded by fruit and nuts .

If you’ve scoured the pandemic-hit canning section at your local store for supplies this year, you know the pickings are slim. My favorite low sugar dry pectin, which was readily available and selling for just a couple dollars a box six months ago, is currently impossible to find here in Eugene, and when I finally turned to online options, I discovered it selling for between $8 and $15 a box…that is madness! And it’s terrible timing, too, because I was recently gifted with a whole pound of organic, dried hibiscus flowers, and I really wanted to make hibiscus hot pepper jelly. What’s a girl to do? Hearken back to the old days!

I want to be clear here at the get-go that you can’t really make a jelly without any pectin. You can, however, make delicious jelly without commercial, store bought pectin, and that’s what this is all about. This jelly is made with an all-natural, DIY apple pectin like the ones cooks used before commercial pectin was invented.

Before we jump into natural pectin and jelly making, allow me to say this: I know it may look like a lot of steps, but this oh-so-delicious, spicy hibiscus jelly is really very easy and a lot of fun. There’s also kitchen science involved, which makes the foodie-nerd in me very happy!

What is Natural Pectin and How Does it Work in Jelly Making?

Pectin is a naturally occurring polysaccharide (a carbohydrate) found in a variety of fruits. Fruits use pectin to build cell walls, so usually young, unripe fruit has more of it than very ripe fruit. Citrus peels, apples, crab apples, plums, and berries like cranberries, gooseberries, and blackberries are all high in natural pectin. Cherries, figs, nectarines, peaches, pears, strawberries, blueberries, etc. are low in pectin.

To get a jam or jelly recipe to jell, you must have a correct ratio of pectin, acid, and sugar to create the chemistry required for a recipe to set up. You can use a store-bought pectin or easily make your own. Fruit tends to be high in acid, and by adding a little citrus juice to the mix, we make sure to hit the proper acid ratio. However, it’s the sugar ratio that tends to put people off of traditional jams and jellies. Unless you are using a commercial, low sugar pectin or a low methoxyl pectin sugar, then jams and jellies require a high ratio of sugar to jell properly. That’s the food science, and there’s no getting around it.

Personally, a little sweet in my life makes me a happier soul. A spoonful of spicy hibiscus jelly with cheese on crackers or a slice of baguette can put a day that’s gone sideways back on course.

Homemade Pectin

As I said above, several fruits are high in natural pectin and are ideal for making homemade pectin. Because the hibiscus flowers came to me in late summer and I have apple trees, I used apple scraps (peels and cores) that I had left over from making applesauce. These were ripe but tart apple varieties (for more natural pectin) including Granvensteins and Granny Smiths. I peeled and cored the apples, put chopped apples in one pot to make applesauce, and the peels and cores in another stockpot to make pectin.

However, remember that there is more pectin in less ripe fruit. If I’d been aware earlier in the summer that I was embarking on an old-school canning adventure, I would have been gathering underripe windfalls from my apple trees as they dropped—those green, hard, sour, often misshapen ones that don’t taste particularly good, but make the best pectin. Then I could have stored the pectin in a sterilized, sealed jar in the refrigerator for a couple weeks, or canned or froze my homemade pectin for later use. Note to self for next year!

This year, though, what I had was beautifully ripe pie apples, so that’s what I went with. I chose the greenest, crispest ones and avoided anything that was sweeter and overly ripe. Even though they were lower in pectin than those windfalls I should have gathered, it’s easy enough to simmer natural pectin down until it’s the right jelling consistency, and that worked fantastically.

Adding this homemade pectin to jams and jellies does not affect the flavor of the other ingredients. Depending on what you’re using, it may make a soft set or a firmer set.

Hibiscus flower hot pepper jelly is a three-step process: make pectin, make hibiscus tea concentrate, and make the jelly. So, first things first, let’s make some pectin. This is a perfect task to do ahead on a day when you’re home cleaning house or hitting the honey-do list. It doesn’t require much from you except a stir once in a while, so that it doesn’t burn to the bottom of the pan. Then you set it aside to drain and you can put it away until you’re ready to use it.

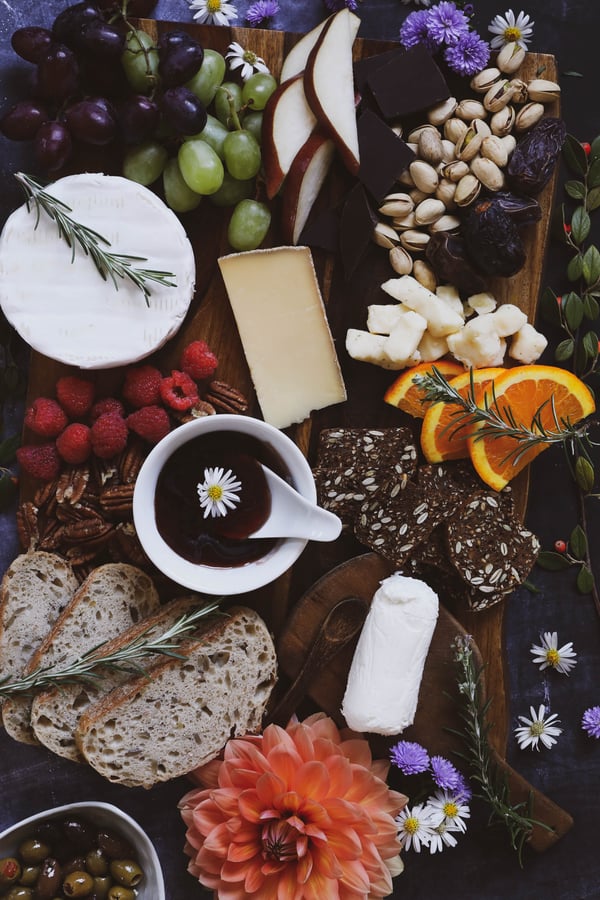
Cheese board with fruit, nuts, baguette, crackers, cheeses and hibiscus hot pepper jelly.

How to Make Homemade Apple Pectin

Ingredients

  • Enough organic green, tart apples, including cores and peels, to fill a large pot 2/3 – 3/4 full (100% cores and peels works great as well)
  • Filtered or spring water
  • Organic lemon or citrus peel, optional

Directions

  1. If you’re using whole apples, wash them well, then chop into quarters—include the cores and peels. If using leftover apple cores and peels from another cooking project, just put them into the pot as is. Fill your pot 2/3 to 3/4 full.
  2. Add just enough water to float the apples. In other words, I poured water over the apples in my stockpot just until the whole pile rose and floated. But I’ve also seen recipes that say pour in enough water to almost but not quite cover the apples. Either way works.
  3. Add optional citrus peel as this ups the pectin level.
  4. Cover the pot and bring to a boil over medium heat, stirring occasionally.
  5. Reduce heat to maintain a simmer, and cook gently, covered, stirring every 20-30 minutes to keep mixture from sticking to bottom of the pan. You’ll need to stir more often as the apples cook down.
  6. Simmer until apples are reduced and very mushy, with loose skins and seeds mixed in. This can take up to 2 hours. The juice should become beautifully golden amber in color.
  7. Pour the hot apple mixture into a jelly bag or a large colander lined with cheesecloth that is set over a food grade bucket or big bowl/pot to catch pectin. Don’t press it down; you want to keep the resulting pectin as clear as possible.
  8. Set aside to drain for several hours or overnight at room temperature (cover to keep gnats or other unwanted visitors out). Again, don’t squeeze or press down on the pulp.
  9. When the liquid pectin has drained into the bucket, compost the apple pulp (my chickens LOVED the pulp).
  10. Ideally, the resulting pectin liquid will be clear and a little viscous. If it’s cloudy or not as thick as you think it should be, don’t panic; it might just need a little more cooking.
  11. Test your pectin to see if it’s ready to use. Apparently old school jelly makers could eyeball it and know when it was thick enough, but I don’t yet have the eye for that. So, I resorted to a more scientific test:
  12. Standing away from your pectin and any open flames, pour a little rubbing alcohol into a small glass or bowl and drop in a spoonful of your drained liquid pectin.
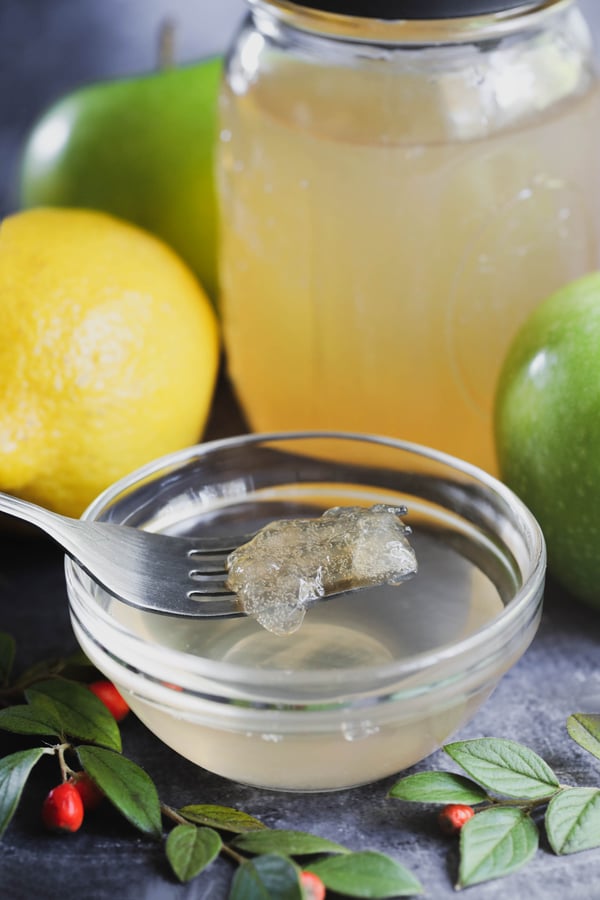
  13. The pectin should coagulate into a jelly-like blob. If you can pick up the blob with a fork and it sits up on the tines without hanging from it, it’s ready to work with. If you cannot pick it up on the fork in more or less one mass of goo, or the pectin mostly hangs from the tines rather than sitting up on them, it’s not ready.
  14. Safely throw away the rubbing alcohol/pectin mixture you made so children and pets can’t get into it.
  15. If your pectin is not ready to jell, pour it into a pot and bring it to a simmer. Continue to simmer the liquid down to increase the concentration of pectin, stirring regularly.
  16. Test as you go—remove a spoonful of pectin from the pot and put it into the freezer to cool (but not freeze). When it’s no longer hot, add it to a bit of rubbing alcohol in a small glass or bowl, as you did above.
  17. Continue cooking and testing until your pectin coagulates in the rubbing alcohol correctly.
  18. When your pectin is ready, store in a sterilized jar in the refrigerator for up to a two weeks. For longer storage, freeze or can in pint or half-pint jars in a water bath canner for 10 minutes.

Homemade pectin being tested for jell with rubbing alcohol.

When you use homemade pectin, the ratio of pectin to fruit, juice, or tea depends on how much natural pectin the other ingredients are bringing to the ratio. For instance, when I made cranberry preserves, there was so much natural pectin in the cranberries that I used just 1/4 cup natural pectin per cup of fruit. Because this is a tea jelly, however, and the hibiscus tea isn’t bringing pectin to the ratio, I used equal parts tea and homemade pectin.

Pro Tips

  • Some people are concerned about cooking with whole apples or cores because apple seeds contain a plant compound called amygdalin. A part of the seeds’ chemical defenses, amygdalin is harmless when a seed is intact, but when a seed is ground up or chewed, the amygdalin degrades and creates hydrogen cyanide, which can be toxic in large quantities. In the case of making natural pectin, we are not breaking the seed coating, nor eating the seeds. Even if you did swallow some unbroken seeds, that seed coating is so hard it will pass through the digestive system undamaged. Additionally, according to the Center for Food Safety, cooking cyanogenic plants in boiling water reduces any cyanide content by over 90%. In other words, we're all good here.
  • When using very green apples, you will not need the optional citrus peel as they are already so high in pectin.
  • When doing this for the first time, it may be difficult to know how much pectin you will yield from the material you are working with. As a rough estimate, you will yield approximately 50% of the volume of the apple scraps that you are using. For example, in my 2.5-gallon stock pot filled 3/4 way, I yielded approximately 1 gallon of liquid pectin.  

Hibiscus Flower Tea Concentrate

Makes about 3 ½ cups

Ingredients

Directions

  1. Add water, cinnamon stick, allspice and optional chilis to a pot. Bring to a boil.
  2. When boiling, add hibiscus flowers. Reduce heat to simmer, cover, and simmer 5 minutes.
  3. Remove from heat and set aside to steep for 5-10 minutes.
  4. Strain out and compost herbs and spices.

Hibiscus Flower Hot Pepper Jelly for Refrigerator or Canning

Makes about 8 cups, or 8 half-pint jars

Ingredients

  • 3 cups hibiscus tea concentrate (recipe above)
  • 3 cups apple pectin
  • 6-8 cups organic sugar
  • 1 Tbsp. organic lime juice
  • 2 tsp. organic chili flakes, or to taste

Directions

  1. Put a small plate in your freezer—you’ll use this later to test your jelly’s consistency.
  2. In a wide pot over medium-high heat, whisk together hibiscus tea concentrate and homemade liquid pectin to equal 6 total cups.
  3. Add equal amount sugar—6 cups. You may need to add more later, depending on the strength of your pectin.
  4. Stir in lime juice and chili flakes.
  5. Bring to a boil, stirring regularly to avoid sticking.
  6. When tea/pectin mixture comes to a boil, turn down burner so you can monitor how hot the jelly is getting. Don’t forget to stir regularly!
  7. When your jelly reaches 8 degrees above boiling point—here in Eugene, where the boiling point is 212°F, I’m aiming for 220°F—it’s time to test the jell! Remove pot from heat.
  8. First do a “spoon test”:
  9. Stir a large metal spoon through the hot jelly.
  10. Lift the spoon over the pot and tip it to pour jelly back into the pot. Watch the last drops that come off the spoon. If they drip like rain on a window, in individual drops, the jell isn’t strong enough yet, and it needs to cook a little longer. Go ahead and let it heat to 10 degrees over boiling point (222°F here in Eugene), and test again.
  11. When the jell is ready, those last drops will stick together and “sheet” off the spoon instead of dripping individually.
  12. If you are 10 degrees over boiling point and you still don’t have sheeting, the pectin/acid/sugar ratio may be off. Fortunately, this tea jelly is very forgiving, and you’ve got wiggle room to adjust the ratio. If you’re trying to keep the sugar down, and you have extra homemade pectin, you can try adding another half cup of pectin. Bring the jelly back up to 8-10 degrees over boiling point, and test again. Still not there? Stir in 1 additional cup of sugar, bring up to temperature, and test again. By adjusting in this manner, you can get the jelly where you want it without damaging the flavor.
  13. When you feel good about the spoon test, you can double check that the jelly is ready with a “wrinkle” test:
  14. Put a spoonful of hot jelly on the cold plate in your freezer and let it sit a couple minutes.
  15. Gently push at the jelly with your finger. It will have formed a surface skin and will wrinkle as you press it forward.
  16. Bring jelly back to a full boil, skim off any foam from the surface, and proceed with storing jelly for use.
  17. For refrigerator storage, pour jelly into clean jars with lids, let cool to room temperature, and put in refrigerator. Jelly will be good for several weeks. For longer term storage, can in half-pint jars in a water bath canner for 10 minutes.

Pro Tips

  • This recipe can be reduced to make less but does not double well.
  • Another possible indicator of when your jelly is ready to test is when it boils up and gets very foamy.
  • Jellies and jams, even when made with store-bought pectin, can be affected by the size of pot you use, the amount of natural pectin other ingredients bring to the ratio, elevation, and humidity. Just remember that jelly that doesn’t set as firmly as you’d like is still delicious and can be drizzled over cream cheese, brie, goat cheese, etc. and also can make an amazing marinade or glaze for your favorite proteins.
  • This tea jelly is a fun project for the holidays, whether you make it as a refrigerator jelly or a canned jelly.
  • The bags of small, green, tart, organic apples work well for the pectin. Don’t choose the beautiful, juicy, eating apples.
  • It is recommended that you review all safety precautions of canning before beginning. 


Want to try another delicious old-school recipe?

Try Homemade Immune-Supporting Root Beer


You may also enjoy:

Hibiscus Flower Hot Pepper Jelly Without Pectin recipe Pinterest pin for Mountain Rose Herbs


Topics: Culinary, Herbal Gift Ideas, Recipes, Herbalism

Heidi

Written by Heidi on October 15, 2020

Heidi is an award winning freelance writer with a passion for urban homesteading. She has been honored to receive a number of literary prizes including the esteemed Pushcart Prize and an Individual Artists Award in Creative Writing from the Oregon Arts Commission and the National Endowment for the Arts. She is proud to have earned a certificate of completion for the Herbal Medicine Making Course at the Chestnut School of Herbal Medicine. When she isn’t working in the garden, cleaning the henhouse, preserving food, crafting herbal formulations, or writing and editing content for really fantastic small businesses, you’ll likely find her with her nose in a book.


WELCOME

We offer one of the most thorough selections of certified organic herbs, spices, and botanical products and are commited to responsible sourcing.

Hibiscus Flower Hot Pepper Jelly with Homemade Pectin

Hibiscus hot pepper jelly with cream cheese on baguette surrounded by fruit and nuts .

If you’ve scoured the pandemic-hit canning section at your local store for supplies this year, you know the pickings are slim. My favorite low sugar dry pectin, which was readily available and selling for just a couple dollars a box six months ago, is currently impossible to find here in Eugene, and when I finally turned to online options, I discovered it selling for between $8 and $15 a box…that is madness! And it’s terrible timing, too, because I was recently gifted with a whole pound of organic, dried hibiscus flowers, and I really wanted to make hibiscus hot pepper jelly. What’s a girl to do? Hearken back to the old days!

I want to be clear here at the get-go that you can’t really make a jelly without any pectin. You can, however, make delicious jelly without commercial, store bought pectin, and that’s what this is all about. This jelly is made with an all-natural, DIY apple pectin like the ones cooks used before commercial pectin was invented.

Before we jump into natural pectin and jelly making, allow me to say this: I know it may look like a lot of steps, but this oh-so-delicious, spicy hibiscus jelly is really very easy and a lot of fun. There’s also kitchen science involved, which makes the foodie-nerd in me very happy!

What is Natural Pectin and How Does it Work in Jelly Making?

Pectin is a naturally occurring polysaccharide (a carbohydrate) found in a variety of fruits. Fruits use pectin to build cell walls, so usually young, unripe fruit has more of it than very ripe fruit. Citrus peels, apples, crab apples, plums, and berries like cranberries, gooseberries, and blackberries are all high in natural pectin. Cherries, figs, nectarines, peaches, pears, strawberries, blueberries, etc. are low in pectin.

To get a jam or jelly recipe to jell, you must have a correct ratio of pectin, acid, and sugar to create the chemistry required for a recipe to set up. You can use a store-bought pectin or easily make your own. Fruit tends to be high in acid, and by adding a little citrus juice to the mix, we make sure to hit the proper acid ratio. However, it’s the sugar ratio that tends to put people off of traditional jams and jellies. Unless you are using a commercial, low sugar pectin or a low methoxyl pectin sugar, then jams and jellies require a high ratio of sugar to jell properly. That’s the food science, and there’s no getting around it.

Personally, a little sweet in my life makes me a happier soul. A spoonful of spicy hibiscus jelly with cheese on crackers or a slice of baguette can put a day that’s gone sideways back on course.

Homemade Pectin

As I said above, several fruits are high in natural pectin and are ideal for making homemade pectin. Because the hibiscus flowers came to me in late summer and I have apple trees, I used apple scraps (peels and cores) that I had left over from making applesauce. These were ripe but tart apple varieties (for more natural pectin) including Granvensteins and Granny Smiths. I peeled and cored the apples, put chopped apples in one pot to make applesauce, and the peels and cores in another stockpot to make pectin.

However, remember that there is more pectin in less ripe fruit. If I’d been aware earlier in the summer that I was embarking on an old-school canning adventure, I would have been gathering underripe windfalls from my apple trees as they dropped—those green, hard, sour, often misshapen ones that don’t taste particularly good, but make the best pectin. Then I could have stored the pectin in a sterilized, sealed jar in the refrigerator for a couple weeks, or canned or froze my homemade pectin for later use. Note to self for next year!

This year, though, what I had was beautifully ripe pie apples, so that’s what I went with. I chose the greenest, crispest ones and avoided anything that was sweeter and overly ripe. Even though they were lower in pectin than those windfalls I should have gathered, it’s easy enough to simmer natural pectin down until it’s the right jelling consistency, and that worked fantastically.

Adding this homemade pectin to jams and jellies does not affect the flavor of the other ingredients. Depending on what you’re using, it may make a soft set or a firmer set.

Hibiscus flower hot pepper jelly is a three-step process: make pectin, make hibiscus tea concentrate, and make the jelly. So, first things first, let’s make some pectin. This is a perfect task to do ahead on a day when you’re home cleaning house or hitting the honey-do list. It doesn’t require much from you except a stir once in a while, so that it doesn’t burn to the bottom of the pan. Then you set it aside to drain and you can put it away until you’re ready to use it.

Cheese board with fruit, nuts, baguette, crackers, cheeses and hibiscus hot pepper jelly.

How to Make Homemade Apple Pectin

Ingredients

  • Enough organic green, tart apples, including cores and peels, to fill a large pot 2/3 – 3/4 full (100% cores and peels works great as well)
  • Filtered or spring water
  • Organic lemon or citrus peel, optional

Directions

  1. If you’re using whole apples, wash them well, then chop into quarters—include the cores and peels. If using leftover apple cores and peels from another cooking project, just put them into the pot as is. Fill your pot 2/3 to 3/4 full.
  2. Add just enough water to float the apples. In other words, I poured water over the apples in my stockpot just until the whole pile rose and floated. But I’ve also seen recipes that say pour in enough water to almost but not quite cover the apples. Either way works.
  3. Add optional citrus peel as this ups the pectin level.
  4. Cover the pot and bring to a boil over medium heat, stirring occasionally.
  5. Reduce heat to maintain a simmer, and cook gently, covered, stirring every 20-30 minutes to keep mixture from sticking to bottom of the pan. You’ll need to stir more often as the apples cook down.
  6. Simmer until apples are reduced and very mushy, with loose skins and seeds mixed in. This can take up to 2 hours. The juice should become beautifully golden amber in color.
  7. Pour the hot apple mixture into a jelly bag or a large colander lined with cheesecloth that is set over a food grade bucket or big bowl/pot to catch pectin. Don’t press it down; you want to keep the resulting pectin as clear as possible.
  8. Set aside to drain for several hours or overnight at room temperature (cover to keep gnats or other unwanted visitors out). Again, don’t squeeze or press down on the pulp.
  9. When the liquid pectin has drained into the bucket, compost the apple pulp (my chickens LOVED the pulp).
  10. Ideally, the resulting pectin liquid will be clear and a little viscous. If it’s cloudy or not as thick as you think it should be, don’t panic; it might just need a little more cooking.
  11. Test your pectin to see if it’s ready to use. Apparently old school jelly makers could eyeball it and know when it was thick enough, but I don’t yet have the eye for that. So, I resorted to a more scientific test:
  12. Standing away from your pectin and any open flames, pour a little rubbing alcohol into a small glass or bowl and drop in a spoonful of your drained liquid pectin.
  13. The pectin should coagulate into a jelly-like blob. If you can pick up the blob with a fork and it sits up on the tines without hanging from it, it’s ready to work with. If you cannot pick it up on the fork in more or less one mass of goo, or the pectin mostly hangs from the tines rather than sitting up on them, it’s not ready.
  14. Safely throw away the rubbing alcohol/pectin mixture you made so children and pets can’t get into it.
  15. If your pectin is not ready to jell, pour it into a pot and bring it to a simmer. Continue to simmer the liquid down to increase the concentration of pectin, stirring regularly.
  16. Test as you go—remove a spoonful of pectin from the pot and put it into the freezer to cool (but not freeze). When it’s no longer hot, add it to a bit of rubbing alcohol in a small glass or bowl, as you did above.
  17. Continue cooking and testing until your pectin coagulates in the rubbing alcohol correctly.
  18. When your pectin is ready, store in a sterilized jar in the refrigerator for up to a two weeks. For longer storage, freeze or can in pint or half-pint jars in a water bath canner for 10 minutes.

Homemade pectin being tested for jell with rubbing alcohol.

When you use homemade pectin, the ratio of pectin to fruit, juice, or tea depends on how much natural pectin the other ingredients are bringing to the ratio. For instance, when I made cranberry preserves, there was so much natural pectin in the cranberries that I used just 1/4 cup natural pectin per cup of fruit. Because this is a tea jelly, however, and the hibiscus tea isn’t bringing pectin to the ratio, I used equal parts tea and homemade pectin.

Pro Tips

  • Some people are concerned about cooking with whole apples or cores because apple seeds contain a plant compound called amygdalin. A part of the seeds’ chemical defenses, amygdalin is harmless when a seed is intact, but when a seed is ground up or chewed, the amygdalin degrades and creates hydrogen cyanide, which can be toxic in large quantities. In the case of making natural pectin, we are not breaking the seed coating, nor eating the seeds. Even if you did swallow some unbroken seeds, that seed coating is so hard it will pass through the digestive system undamaged. Additionally, according to the Center for Food Safety, cooking cyanogenic plants in boiling water reduces any cyanide content by over 90%. In other words, we're all good here.
  • When using very green apples, you will not need the optional citrus peel as they are already so high in pectin.
  • When doing this for the first time, it may be difficult to know how much pectin you will yield from the material you are working with. As a rough estimate, you will yield approximately 50% of the volume of the apple scraps that you are using. For example, in my 2.5-gallon stock pot filled 3/4 way, I yielded approximately 1 gallon of liquid pectin.  

Hibiscus Flower Tea Concentrate

Makes about 3 ½ cups

Ingredients

Directions

  1. Add water, cinnamon stick, allspice and optional chilis to a pot. Bring to a boil.
  2. When boiling, add hibiscus flowers. Reduce heat to simmer, cover, and simmer 5 minutes.
  3. Remove from heat and set aside to steep for 5-10 minutes.
  4. Strain out and compost herbs and spices.

Hibiscus Flower Hot Pepper Jelly for Refrigerator or Canning

Makes about 8 cups, or 8 half-pint jars

Ingredients

  • 3 cups hibiscus tea concentrate (recipe above)
  • 3 cups apple pectin
  • 6-8 cups organic sugar
  • 1 Tbsp. organic lime juice
  • 2 tsp. organic chili flakes, or to taste

Directions

  1. Put a small plate in your freezer—you’ll use this later to test your jelly’s consistency.
  2. In a wide pot over medium-high heat, whisk together hibiscus tea concentrate and homemade liquid pectin to equal 6 total cups.
  3. Add equal amount sugar—6 cups. You may need to add more later, depending on the strength of your pectin.
  4. Stir in lime juice and chili flakes.
  5. Bring to a boil, stirring regularly to avoid sticking.
  6. When tea/pectin mixture comes to a boil, turn down burner so you can monitor how hot the jelly is getting. Don’t forget to stir regularly!
  7. When your jelly reaches 8 degrees above boiling point—here in Eugene, where the boiling point is 212°F, I’m aiming for 220°F—it’s time to test the jell! Remove pot from heat.
  8. First do a “spoon test”:
  9. Stir a large metal spoon through the hot jelly.
  10. Lift the spoon over the pot and tip it to pour jelly back into the pot. Watch the last drops that come off the spoon. If they drip like rain on a window, in individual drops, the jell isn’t strong enough yet, and it needs to cook a little longer. Go ahead and let it heat to 10 degrees over boiling point (222°F here in Eugene), and test again.
  11. When the jell is ready, those last drops will stick together and “sheet” off the spoon instead of dripping individually.
  12. If you are 10 degrees over boiling point and you still don’t have sheeting, the pectin/acid/sugar ratio may be off. Fortunately, this tea jelly is very forgiving, and you’ve got wiggle room to adjust the ratio. If you’re trying to keep the sugar down, and you have extra homemade pectin, you can try adding another half cup of pectin. Bring the jelly back up to 8-10 degrees over boiling point, and test again. Still not there? Stir in 1 additional cup of sugar, bring up to temperature, and test again. By adjusting in this manner, you can get the jelly where you want it without damaging the flavor.
  13. When you feel good about the spoon test, you can double check that the jelly is ready with a “wrinkle” test:
  14. Put a spoonful of hot jelly on the cold plate in your freezer and let it sit a couple minutes.
  15. Gently push at the jelly with your finger. It will have formed a surface skin and will wrinkle as you press it forward.
  16. Bring jelly back to a full boil, skim off any foam from the surface, and proceed with storing jelly for use.
  17. For refrigerator storage, pour jelly into clean jars with lids, let cool to room temperature, and put in refrigerator. Jelly will be good for several weeks. For longer term storage, can in half-pint jars in a water bath canner for 10 minutes.

Pro Tips

  • This recipe can be reduced to make less but does not double well.
  • Another possible indicator of when your jelly is ready to test is when it boils up and gets very foamy.
  • Jellies and jams, even when made with store-bought pectin, can be affected by the size of pot you use, the amount of natural pectin other ingredients bring to the ratio, elevation, and humidity. Just remember that jelly that doesn’t set as firmly as you’d like is still delicious and can be drizzled over cream cheese, brie, goat cheese, etc. and also can make an amazing marinade or glaze for your favorite proteins.
  • This tea jelly is a fun project for the holidays, whether you make it as a refrigerator jelly or a canned jelly.
  • The bags of small, green, tart, organic apples work well for the pectin. Don’t choose the beautiful, juicy, eating apples.
  • It is recommended that you review all safety precautions of canning before beginning. 


Want to try another delicious old-school recipe?

Try Homemade Immune-Supporting Root Beer


You may also enjoy:

Hibiscus Flower Hot Pepper Jelly Without Pectin recipe Pinterest pin for Mountain Rose Herbs


Topics: Culinary, Herbal Gift Ideas, Recipes, Herbalism

Heidi

Written by Heidi on October 15, 2020

Heidi is an award winning freelance writer with a passion for urban homesteading. She has been honored to receive a number of literary prizes including the esteemed Pushcart Prize and an Individual Artists Award in Creative Writing from the Oregon Arts Commission and the National Endowment for the Arts. She is proud to have earned a certificate of completion for the Herbal Medicine Making Course at the Chestnut School of Herbal Medicine. When she isn’t working in the garden, cleaning the henhouse, preserving food, crafting herbal formulations, or writing and editing content for really fantastic small businesses, you’ll likely find her with her nose in a book.