It’s the time of year when I’m working my way through the last of our stored root vegetables and winter squash looking for ways to extend their lifespan and nutrition. With this in mind, I spent an afternoon last weekend hasselbacking. In its simplest form, hasselbacking is a special cutting method for raw vegetables (also some fruits and even bread) before roasting. The most common version is Hasselback potatoes: the Potato à la Hasselbacken or, in Swedish, hasselbackspotatis. The glory of this cutting/cooking method is that it allows you to get flavorful fats and your favorite herbs and spices down inside the food so all that deliciousness gets roasted in. Plus, hasselbacking makes your food so pretty!
Depending on what you hasselback, you can serve it as a main course, side dish, or appetizer. Plus, you can roast a variety of flavors at the same time on the same pan, simply by adding different herbs to individual vegetables. And hasselbacked root vegetables and winter squash freeze well, which can add a few more weeks to leftovers and overwintered root vegetables and winter squash. Leftovers are excellent reheated for breakfast potatoes with eggs, mashed for shepherd’s pie topping, and more.
As well as root vegetables (including potatoes, sweet potatoes, carrots, parsnips, beets, etc.) and winter squash, you can hasselback eggplant (leave the skin on), summer squash, apple halves, etc. Sweet and hot peppers and tomatoes don’t roast well with this method; it’s best to stuff those whole so they will hold their shape.
First things first, here’s how to hasselback potatoes and sweet potatoes—they’re good vegetables to learn on and then you can take your new skill and go wild.
Hasselback Potatoes (or Sweet Potatoes)
Makes 3 medium potatoes or sweet potatoes.
Ingredients
- 3 medium organic potatoes or sweet potatoes (about 1/2 lb. each)
- 2-3 Tbsp. organic extra virgin olive oil + more for greasing pan (fat is what crisps the potato slices, so don’t scrimp)
- 2-3 Tbsp. organic butter, herbal compound butter, or butter alternative, melted (same note as above)
- 1-1 1/2 tsp. organic seasoning salt of choice, herb blend of choice, homemade seasoning salt (see below), or homemade seasoning salt with mushroom powder (see below)
- Organic black, white, or rainbow pepper to taste
- 1 large clove garlic, grated or minced (optional)
- Optional toppings (see below)
Directions
- Preheat oven to 400°F.
- Wash and dry potatoes. If they are tender-skinned, you don’t need to peel them, but if they are older or tough-skinned, you can choose to peel. See pro tips for a peeling trick.
- Set a peeled or unpeeled potato on a cutting board. Lay a chopstick or wooden spoon handle that is about 1/3 the thickness of the potato on both sides to keep you from cutting all the way through to the cutting board.
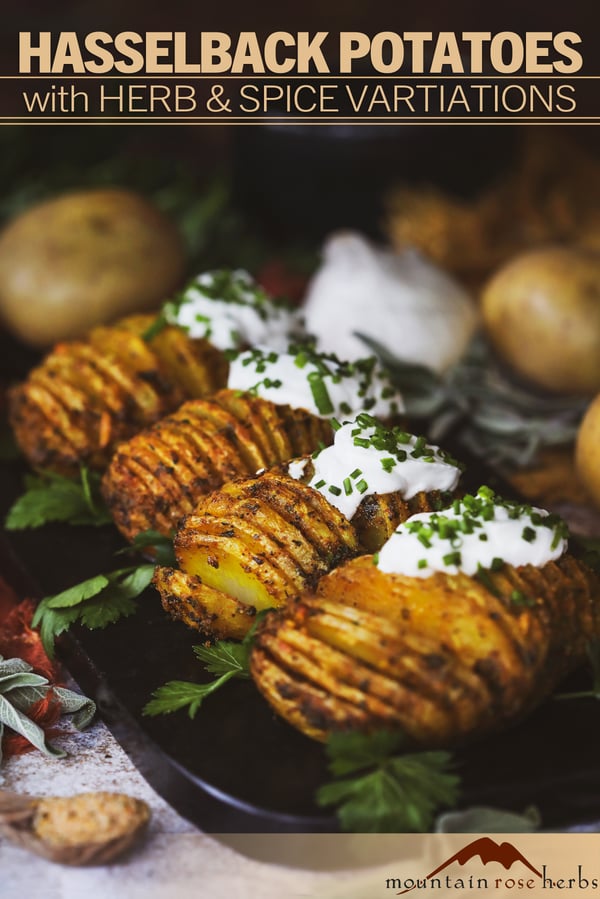
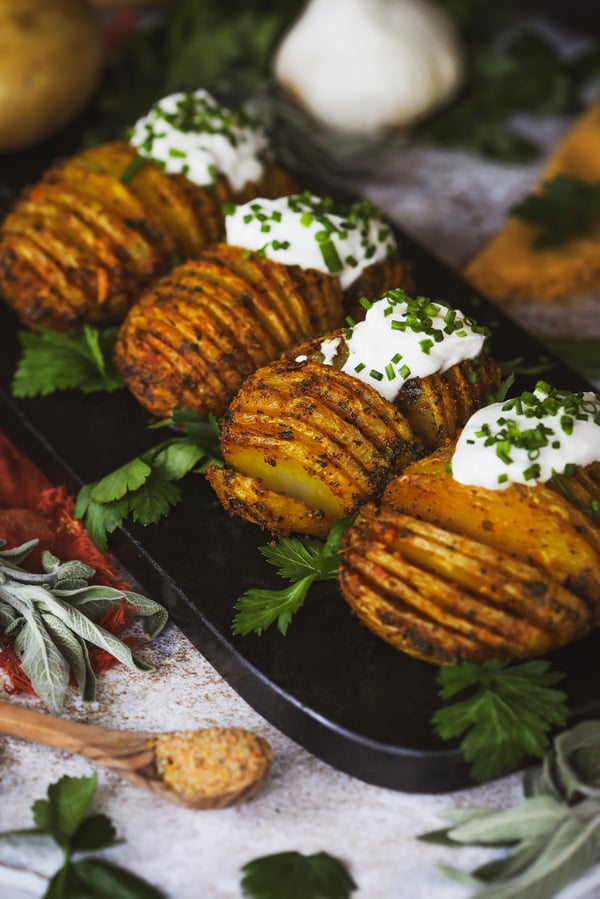
- Using a sharp knife, begin about 1/8-1/4 inch from one end and slice down to the utensils. Repeat along the length of the potato, making equally spaced slices 1/8-1/4 inch apart that stop at the utensils. The bottom of the potato should remain uncut. Repeat with remaining potatoes. Set aside.
- Oil a baking pan with olive oil and place potatoes uncut-side down in the pan.
- Whisk together melted butter, olive oil, herb salt or herb blend, pepper, and optional minced garlic.
- Brush butter/oil mixture all over the potatoes and down between the slices. Use a chopstick, skewer, or butter knife to gently spread the slices a bit to get the fat mix all the way down between. Thoroughly cover every surface as much as possible for the best crispiness and flavor. Scoop up anything that drips onto the pan and spread it back over and into the potatoes.
- Put in the preheated oven uncovered and bake until fork tender, about 50-60 minutes for a medium potato or sweet potato. Start checking potatoes at about 40 minutes—if they are getting too dark, lay a piece of parchment paper over the top. Remove from oven and serve.
- Add optional toppings at service (see below).
Pro Tips:
- Here’s a handy peeling trick for hasselbacking root vegetables and winter squash: Use a peeler or knife to peel a stripe about 1/3 of the way up around the long circumference of the vegetable. Peel everything above that line. The peel you leave on the bottom helps keep the Hasselback vegetable intact as you roast. If you do this, you may not need the chopsticks trick—just cut down to the top of the remaining peel.
- 1/8-inch slices will cook faster and be crispier than 1/4-inch slices.
- If it’s hard to eyeball 1/8-1/4” slices, you can lay a ruler or tape measure next to the chopstick or utensil handle.
Toppings for Hasselback Potato
- Finely grated cheese—Sprinkle 2-4 Tbsp. on top of each potato when they are fork tender. Put back in oven to melt cheese, another 5-10 minutes.
- Sour cream, creme fraîche, unsweetened plain yogurt, or nondairy alternative. For extra flavor, whisk in minced shallot, scallion, onion, or garlic and set aside for at least 15 minutes for flavors to meld. Top potatoes at serving.
- Seeds— Ajwain, black (nigella), brown mustard, caraway, cumin, everything bagel seasoning, fenugreek, poppy, etc. Toast seeds in a skillet until aromatic. Sprinkle on top of potatoes at about 30 minutes of cooking time or at service.
- Bread crumbs—Mash garlic granules or garlic powder and dried herbs of choice into butter or butter alternative, spread on bread, and toast before making crumbs for extra garlic and herb goodness. Sprinkle on top at about 30 minutes of cooking time.
- Spicey spices—Ground chili peppers, smoked cayenne, smoked paprika, etc. Mix with fat blend to permeate whole potato or sprinkle on top at service.
- Fresh minced herbs—Parsley, cilantro, sage, etc. Add thicker-leafed herbs like sage to the fat mix. Sprinkle tender herbs like parsley and cilantro on top at service.
- Herbal Blends for Hasselback Potatoes, Sweet Potatoes, and More- Premade herbal salt and herb blends are excellent choices for hasselbacking and allow you to easily change flavor options. Some of the Mountain Rose Herbs seasoning blends my family loves include cajun seasoning, garlic & herb seasoning, taco seasoning, and za’atar seasoning. My favorite homemade blend is this herbal seasoning salt that my family keeps on hand all the time. This is also the blend we use to make mushroom bouillon powder for ramen.

Homemade Seasoning Salt Recipe
Makes about 1/3 cup.
To get the right consistency, use powdered herbs or grind leafy herbs into a powder before measuring. Use either a mortar and pestle or a coffee grinder, put the ground herbs through a mesh strainer, then measure.
Ingredients
- 3 Tbsp. fine sea salt, or to taste (if using kosher salt, you will need a little more)
- 1 Tbsp. organic onion granules or onion powder
- 2 tsp. organic garlic granules or garlic powder
- 1 tsp. organic celery seed powder
- 1 tsp. organic parsley leaf
- 1/2 tsp. organic thyme leaf
- 1/2 tsp. organic basil leaf
- 1/2 tsp. organic coriander seed powder
- 1/2 tsp. organic yellow ground mustard seed
- 1/2 tsp. organic paprika powder
- 1/2 tsp. organic turmeric root powder
- 1/2 tsp. organic ground black pepper
Directions
- Whisk all ingredients together to thoroughly combine.
- Store in an airtight jar in a cool dark place. When properly stored, powdered herbs have a shelf life of about 6-12 months. You can keep this in the refrigerator or freezer for longer shelf life.
- Shake the jar to reincorporate ingredients before using.
Homemade Seasoning Salt with Mushroom Powder
Makes just over 1/3 cup mushroom seasoning salt.
Ingredients
- 1/3 cup Organic shiitake mushroom powder or other culinary mushroom powder
- 1 Tbsp. Homemade seasoning salt recipe above
Directions
- Whisk together mushroom powder and seasoning salt.
- Store in an airtight jar in a cool, dark place. When properly stored, powdered herbs have a shelf life of about 6-12 months. You can keep this in the refrigerator or freezer for longer shelf life.
- Shake the jar to reincorporate ingredients before using.
DIY Spice Blends for Hasselback Potatoes and Veggies
- Homemade Za’atar Recipe
- Berbere Spice Blend from Ethiopia
- Punjabi Cumin Spice Blend Recipe from India
- Advieh Spice Blend Recipe from Iran
Want More Herbal Salt Blend Recipes?
Read How to Make Herbal Salt Blends + 4 Recipes!
You may also enjoy:
- Herbal Compound Butter Recipes (2 Ways)
- Sprinkle-On Herb & Spice Blends for Four Season Wellness
- Herbs for Health: 11 Superfood Powders to Sprinkle Into Your Diet