
There are a lot of reasons to love summer, but a big one here in the Willamette Valley of Oregon is the wealth of fresh garden and farm produce. We’re heading into salad season, always a good opportunity to explore new flavors and ways to enjoy the freshest greens, ripest tomatoes, crispest cucumbers, sweetest corn, and more. We’ve got four standout salad dressing recipes from around the world for you to enjoy this season, along with ideas about how to best use them: horiatiki from Greece, wafu from Japan, esquites from Mexico, and tahini-lemon from the Middle East. Enjoy!
Greece
Horiatiki is a rustic salad with an entrepreneurial history. In the 1960s and 70s, Athens, Greece was experiencing a tourism boom. The story goes that, as a way to get around government-set prices on salads, restaurateurs added a slab of feta cheese to a simple salad of tomatoes, cucumber, onion, peppers, and olives—making it more than a salad and therefore not subject to the price controls. The popularity of delicious Horiatiki spread quickly and today it is known around the world as a “Greek salad.” You can find different variations of Greek salads throughout Greece and practically everywhere else too, but a classic Horiatiki includes only perfectly ripe tomatoes, cucumbers, green bell peppers, red onions, and Kalamata olives tossed with extra virgin olive oil and a splash of red wine vinegar so the flavors blend. The quality of the olive oil will shine in this recipe, so this is a time to get a good one! The salad is then topped with a sprinkling of salt and dried oregano and served with a slab (not crumbed) of feta cheese.

Horiatiki
Greek Salad Dressing Ingredients
- Organic extra virgin olive oil
- Organic red wine vinegar
Directions
- You don’t have to make a dressing—you can simply drizzle a little oil and a splash of vinegar on the vegetables. If you want to make a dressing ahead of time, however, put 3 parts olive oil in a jar with 1 part red wine vinegar. Put on the lid and shake to thoroughly combine.
Greek Salad Ingredients
- Organic ripe tomatoes, cut into wedges or roughly chopped into large chunks
- Organic cucumber, seeded and sliced into 1/2-inch thick half-moons
- Sea salt
- Organic red onion, sliced into rings or half-rings
- Organic green bell pepper, seeded and sliced or diced
- Organic Kalamata or green olives
- Dried organic Greek oregano
- Ground organic black pepper (optional)
- Organic Greek feta cheese in block form
Directions
- Place the tomatoes and cucumbers in a shallow serving bowl and sprinkle with a pinch or two of salt. Gently mix and set aside for a few minutes.
- Add the red onion, bell pepper, and olives to the bowl and gently mix to combine.
- Drizzle with olive oil and a splash of red wine vinegar or a bit of the combined dressing ingredients. Gently mix to thoroughly coat vegetables.
- Add seasoning: Sprinkle with a pinch of salt; crush a pinch or two of dried oregano between your fingers, and sprinkle over the top; sprinkle with optional ground pepper. Gently mix salad to combine and adjust seasonings and vinegar to taste. *Remember, you’re going to add salty feta, so go easy on the salt.
- Top with a hearty slab of feta cheese large enough for all eaters to share. Drizzle cheese with a little olive oil and a sprinkle of crushed oregano and optional pepper.
- Serve with more olive oil and vinegar or combined dressing so eaters can adjust personal salads to their taste.
- Dressed salad will keep up to 3 days in the refrigerator.
Pro Tips
- At step 5, you may choose to serve the salad on individual plates or bowls before adding the feta. In that case, add a smaller individual slab of feta to the top of each salad and continue as above.
- You can prepare the vegetables up to a day ahead of time and keep them in the fridge until ready to serve but don’t salt or add dressing until just before serving.
- Traditionally, Horiatiki was eaten with bread rather than pita.
Japan
As I understand it, western-style salad dressings found their way to Japan in the late 1950s and chefs began adapting them to Japanese palates. From those experiments, wafu (和風 meaning Japanese-style) dressing was born in the 1970s: a mixture of soy sauce, vinegar, and vegetable oil. There are now roughly a bazillion different wafu dressing recipes made with traditional Japanese ingredients that are perfect for any salad or vegetable that benefits from a sweet/savory flavor combination. Wafu dressing is also wonderful on noodle bowls, rice, a wide variety of proteins, cooked vegetables and stir-fries, and as a dipping sauce.
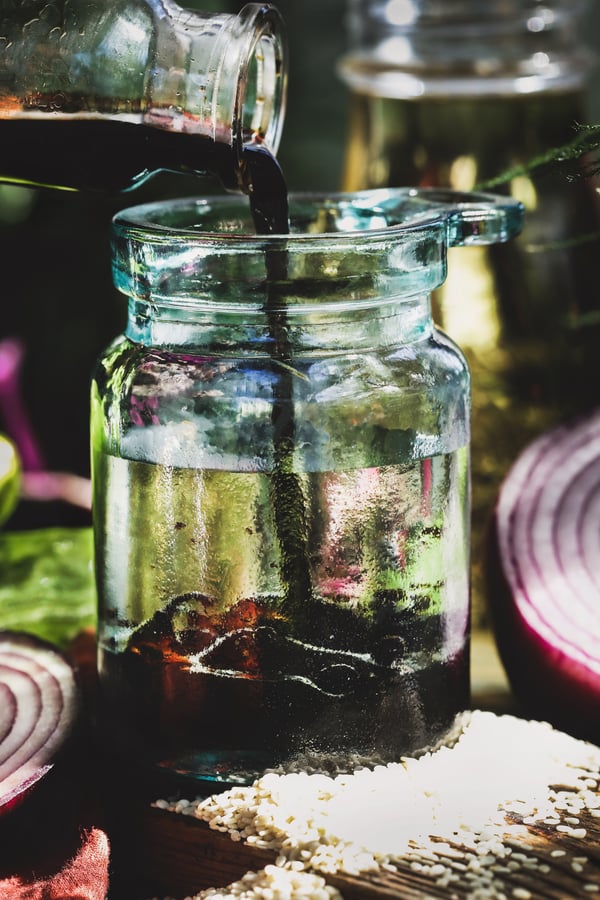
Wafu Dressing
Japanese-Style Dressing Ingredients
- 1 tsp. organic white sesame seeds
- 2 Tbsp. organic neutral-flavored oil like grapeseed, sunflower, or avocado oil
- 2 Tbsp. organic soy sauce or tamari
- 2 Tbsp. organic unseasoned rice vinegar
- 1-2 tsp. grated organic onion
- Organic sugar to taste (optional, but the sugar balances the acid in the vinegar and balances the flavors)
- Organic sesame oil (optional) for even more sesame flavor
- Water (optional)
Directions
- Pan-toast the sesame seeds in a dry skillet over medium-low heat, stirring constantly so as not to burn, until seeds are fragrant and just starting to color. Set aside to cool.
- Put into a jar or whisk together in a bowl the following ingredients: toasted sesame seeds, oil, soy sauce or tamari, rice vinegar, 1 tsp. grated onion, 1/2 tsp. optional sugar, and 1/2 tsp. optional sesame oil. Cap the jar and shake to thoroughly combine or whisk together in the bowl. Adjust flavors to taste.
- If dressing is too strong for your taste, drizzle in a little water at a time to achieve a milder flavor.
- Dressing will keep in a well-sealed jar in the refrigerator for 5-7 days.
Japanese-Style Summer Salad Directions
- Serve wafu over green salads, cucumbers, and other fresh garden vegetables, or grilled vegetable medleys.
Pro Tip: Feel free to add a little bit of grated ginger root and garlic to the above dressing recipe!
Mexico
Esquites are delicious Mexican street food sold as an easy-to-carry snack at stands, food trucks, street vendors, and restaurants all over Mexico. Also known as “elote en vaso” (corn in a cup), the word esquites is derived from a Nahuatl word “ízquitl”, meaning toasted corn. Esquites are the salad form of another Mexican snack “elotes,” which are grilled white corn on the cob that is sold with a creamy sauce and seasoned with chile powder, cheese, and lime. Esquites brings all the joys of elotes into a convenient salad form that is perfect served as a side for summer meals or to grab and go on your way out the door for a hike. Although it is best when made with grilled corn scraped from the cob (note: esquites are a great way to use up leftover corn on the cob), you can also make this recipe perfectly well with frozen corn.

Esquites Salad Dressing
Makes about 1/2 cup
Ingredients
- 1/4 cup mayonnaise or vegan mayonnaise
- 1/4 cup organic Mexican crema or creme fraiche
- 1 medium clove organic garlic, finely grated
- 2-3 tsp. freshly squeezed organic lime juice
- 1/4-1/2 tsp. organic chipotle powder, or to taste
Directions
- Whisk all the ingredients together in a bowl. Start with less lime juice and chipotle powder and add more to taste. Set aside for flavors to blend while you combine the esquites ingredients.
Pro Tip: Want to make your own Mexican-style crema? Whisk together 1 cup heavy cream with 2 Tbsp. buttermilk. Cover the bowl tightly and set aside at room temperature for 24 hours. When the cream/buttermilk mixture has thickened, stir in the juice of half a lime and a couple of pinches of salt. Store crema in a well-sealed container in the refrigerator for up to a week. Warm to room temperature before using.
Esquites Recipe
Traditionally, esquites are made with white corn that has been grilled, but it’s perfectly okay to use what you can get during summer corn season. This recipe is a good way to use up leftover corn on the cob, and frozen corn works well too.
Ingredients
- About 3 cups cooked white or yellow corn—grilled, roasted, boiled, or frozen
- Organic neutral-flavored oil like grapeseed, sunflower, or avocado oil
- Organic butter or vegan butter (optional)
- Sea salt
- Ground organic black pepper
- 1 small organic white, red, or yellow onion, or large shallot, chopped small
- 2 medium cloves organic garlic, finely chopped
- 1-2 Tbsp. finely chopped hot pepper of choice—jalapeño, serrano, anaheim, poblano, etc., to taste (optional)
- Organic cotija cheese or substitute with feta cheese
- Fresh chopped cilantro
- Fresh organic lime wedges
Directions
- If using grilled, roasted, or boiled corn on the cob, scrape the kernels from the ear. If using frozen corn, measure out quantity.
- If using grilled corn that already has a nice smoky flavor, heat a cast iron or other heavy skillet over medium-high heat. When hot, add about 1 Tbsp. oil or a combination of oil and butter. Add the corn kernels, tossing briefly to coat in oil. Sprinkle with a couple of pinches of salt and a little pepper and stir to combine and heat through. Set aside in a bowl.
- For boiled or frozen corn, heat a dry cast iron or other heavy skillet over medium-high heat. When hot, add the corn kernels and cook to char them somewhat, stirring regularly to keep them from getting too burnt. When they are nicely charred, stir in about 1 Tbsp. oil along with a couple of good size pinches of salt and a little ground pepper. Set aside in a bowl.
- Return the skillet to the heat. Add about 1 Tbsp. oil or a combination of oil and butter. Add chopped onion. Fry, stirring as needed to keep from burning, until softened.
- Add minced garlic and optional hot pepper. Sauté, stirring as necessary, until onions are translucent and pepper is nicely softened.
- Stir in the warm corn kernels. Add a little more oil and/or butter if necessary to coat. Remove from heat to cool slightly.
- Stir in about 1/4 cup of the dressing (recipe above) to the warm corn mixture. Add more if you want it creamier.
- Traditionally, esquites are served in paper cups for ease of transportation, but it makes a beautiful side dish in a serving bowl as well. Either way, top with crumbled cotija or feta cheese and cilantro.
- Serve warm or at room temperature with a lime wedge.
- Leftovers will keep in the fridge in an airtight container for 2-3 days. Reheat on the stovetop or in a microwave until just warm.
Pro Tips
- There are a lot of different versions of esquites. You may want to substitute bell peppers for the hot peppers. Mix esquites with cooked black beans for an extra boost of protein. Or add diced avocado and/or green onions to the toppings.
- Toss leftover esquites with cooked pasta and little olive oil for an easy corn-pasta salad the next day!
Middle East
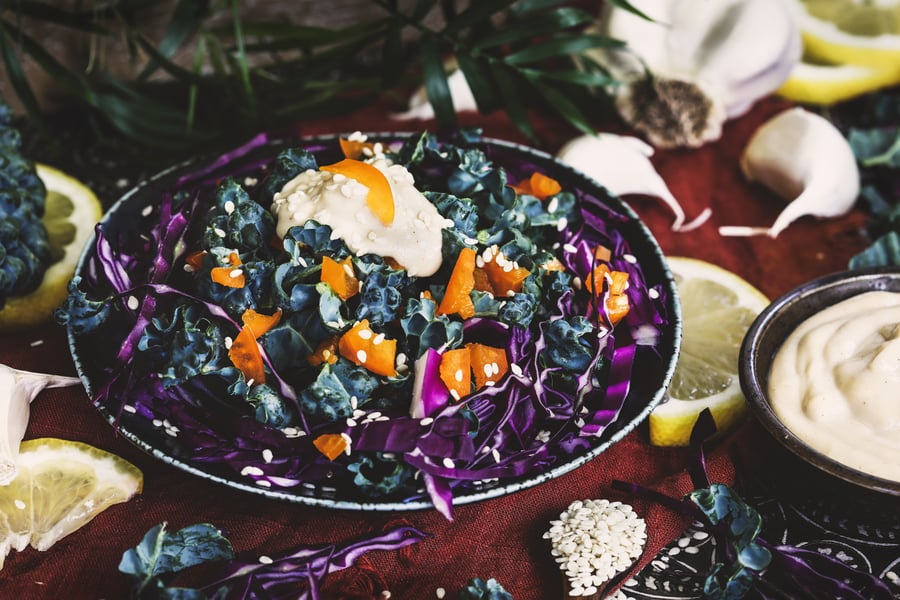
Tahini is an age-old Middle Eastern condiment made from ground sesame seeds. It can be served as-is as a dip and is a key ingredient in hummus, baba ghanoush, etc. But you can also thin tahini down and add delicious herbs and spices to make it into a wonderful, savory dressing that is perfect for hearty greens like kale, roasted summer vegetables, beans, and grains. Although you can purchase pre-made tahini, making homemade tahini is a simple task that gives you a flavor boost and significant savings over the store-bought versions. Note that you do need a good food processor or powerful blender to make tahini easily.
Homemade Tahini Recipe
Ingredients
- 1 cup organic hulled (white) sesame seeds
- 2-4 Tbsp. organic neutral-flavored oil like grapeseed, sunflower, or avocado oil
- Sea salt
Directions
- Pan-toast the sesame seeds in a dry skillet over medium-low heat, stirring constantly so as not to burn, until seeds are fragrant and just starting to color. Set aside to cool.
- Process cooled seeds in a food processor or blender briefly, just until they start to come together. They will start to turn into a crumbly paste.
- Scrape down the sides, add 2-3 Tbsp. of oil, and process again until smooth, 2-3 minutes. The tahini should be smooth, not gritty, and should have a pourable consistency. If necessary, add another 1-2 Tbsp. oil and process again.
- When you’ve achieved the right consistency, taste-test and add salt to taste. It should only require a pinch or two. Process briefly to combine.
- Store homemade tahini in a well-sealed jar in the refrigerator for up to 4 weeks. If the oil rises to the top, just stir it back in.
Tahini-Lemon Dressing Recipe
Makes about 1 1/2 cups
Ingredients
- 1/2 cup organic sesame tahini (above)
- 3-5 Tbsp. freshly squeezed organic lemon juice (about 2 medium lemons), or to taste
- 1 medium clove organic garlic, finely grated
- 1 Tbsp. organic extra virgin olive oil
- Water
- Sea salt
- Ground organic black pepper (optional)
- Organic cayenne powder (optional) to add spice
Directions
- Combine tahini, 3 Tbsp. lemon juice, grated garlic, and olive oil in a bowl. Thoroughly whisk together. Alternatively, put into a food processor or blender and process to combine.
- Taste-test for lemon. If you want more, add it now 1/2-1 Tbsp. at a time.
- While whisking constantly or keeping the motor running on the food processor/blender, drizzle in water to thin the mixture to a dressing consistency.
- Stir in salt to taste along with optional ground pepper and cayenne powder. *Start with just a pinch of each and slowly dial in ideal spice level for your palate.
- Dressing will keep in a well-sealed jar in the refrigerator for 3-4 days. Shake or stir to recombine if necessary before using.
Pro Tip: A touch of ground organic turmeric powder makes a nice addition to this tahini sauce if you are a turmeric lover.
Tahini Summer Salad Directions
- Consider using Lemon-Tahini Dressing on salads made with hearty greens like kale and cabbage. It is also delicious on brassicas like cauliflower, as well as summer dinner salads made with canned beans and sun-ripened tomatoes. This dressing is easy to bring camping as well and makes a fantastic topping to fire-roasted vegetables.
Want more salad recipes for summer?
Try these 3 Easy & Light Summer Salad Dressing Recipes!
You may also enjoy:
- Sprout Salad Recipe with Bee Pollen
- 5 Iced Teas for Summer
- Summer Cookout Menu: Recipes & Inspiration