If you’ve ever dried herbs in your home, or arranged aromatic resins in an incense dish, or placed a jar of lavender stems on a shelf, you know that herbs and spices—as well as adding compelling flavors to food and providing healthful benefits to our bodies—bring a natural beauty and delicious fragrance to our homes. And when you put those natural ingredients into the hands of a master crafter, you can end up with unique herbal decorations that are simple to do even for those of us who aren’t so “crafty.”
All of which explains my craft-trade relationship with my friend Monika. We’ve been friends for going on 30 years, and we regularly set aside “craft days” in which we get together to play, experiment, and create (they used to be craft weekends, but then we both had children!). The key to our crafting relationship is that we each have very different skills. If you have a fabric, writing, or food project you need help with, I’m the one to call. If you have a whole pile of amazing herbal ingredients, some bits of twine and ribbon, and a vague idea that you want to create something beautiful from them, sit Monika in front of the pile with a pair of scissors and some glue, and just stand back!
Planning for the winter holidays this year, we got together in early September and gathered pine cones, cedar, hydrangea flowers, lavender, and moss from my neighborhood, which we set out to dry for later crafting. In mid-October, we got back together with our (now dried) foraged goods and that previously mentioned pile of herbs for a crafting day.
She arrived with her sweet kids (the “littles”), and supplies for Halloween costumes (the sewing of said costumes being my part of our craft-trade this day). In friendship and with much laughter—okay, and a bottle of wine—we spent the day coming up with these five lovely decorating ideas that anyone can do.
Kid-Friendly Crafting (Adult Supervision Recommended)
These first three projects are so easy, they’re perfect for doing with kids! We do recommend a bit of oversight with the use of the hot glue guns, but these crafts still give little ones plenty of opportunity to have fun and get creative.
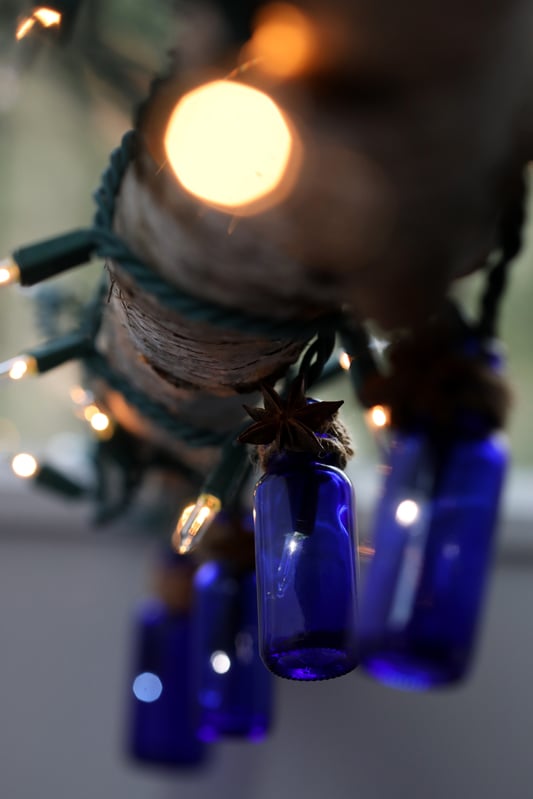
Blue Bottle String Lights
Supplies
- String of standard 1/2 in. clear holiday lights in length of choice
- Small (1/2 oz. to 1 oz. size) cobalt glass bottles or other narrow-necked upcycled bottles (enough for one bottle every 3-5 lights, depending on desired spacing
- Sturdy twine
- Low-heat glue gun or craft glue that is good with glass/china
- Dried botanicals to glue to outside of bottle (hops flowers and star anise pods look lovely together)
Directions
- Take a bottle and wrap twine around its neck twice, cut, and unwind. Using this first piece as a guide, measure out and cut more lengths of twine, one for each bottle.
- For each bottle, add a circle of glue around neck, wrap twine around twice, and apply pressure to adhere.
- When the glue dries, add a bit more glue on top of where twine ends meet to make sure you have a secure hold.
- Keep it simple, or glue on dried herbs and/or spices of choice. The littles in our group like to add star anise pods to cover the overlapping twine ends!
- Take string of lights and decide on desired bottle spacing (see Pro Tips below).
- Take a bottle and insert end of first light through bottle opening until the bulb, its holder, and some of the cord on either side are inside. This should fill enough space to hold the bottle onto the string.
- Count over desired number of lights and attach another bottle as in step 6. Repeat until string is complete.
- Drape festively, illuminate, and enjoy!
Pro Tip
- Consider wider spacing between bottles if you plan to wrap lights around a railing or garland, narrower if you plan to string them up on their own.
- For a more secure attachment between the lights and bottle, pack a small amount of poster putty around the inside rim of each bottle to hold each light firmly in place.
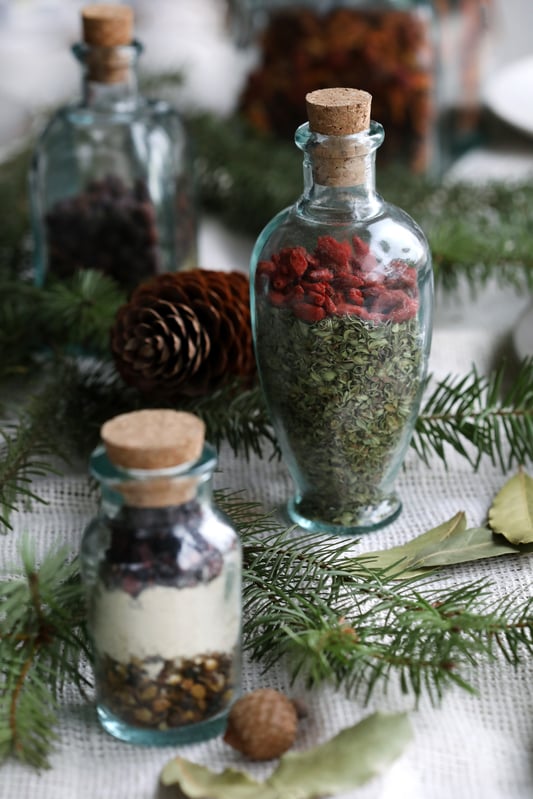
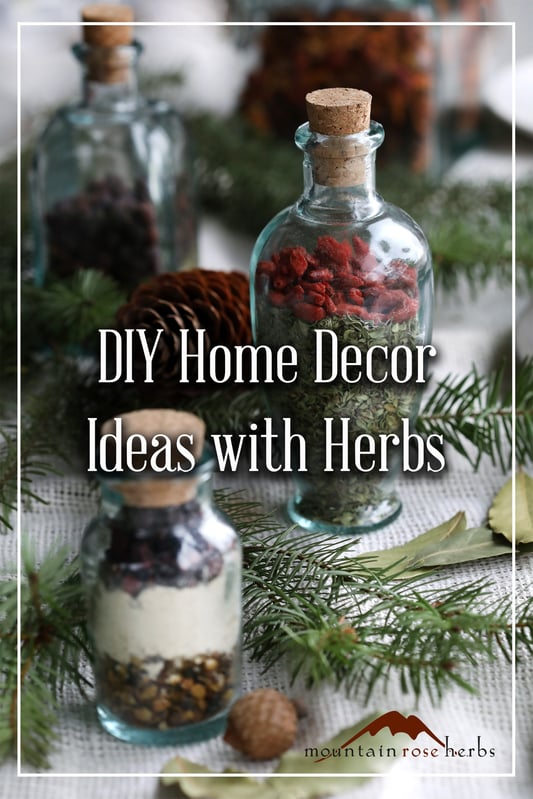
Decorative herb jars
Supplies
- Assorted clear glass apothecary jars
- Colorful dried botanicals of your choice (some of our festive favorites include goji berries, nettle leaf, red Alaea salt, and cassia cinnamon chips, the options are really endless!)
Directions
- Select 1 to 3 botanicals (or more, if your jar is tall enough) based on what colors and textures you think will look nice together.
- Pour first botanical into jar and shake lightly from side to side to settle evenly.
- Repeat with each botanical to create neat layers.
- Cork your bottles, arrange, and admire!
Cinnamon Stick Votive Candle Holder
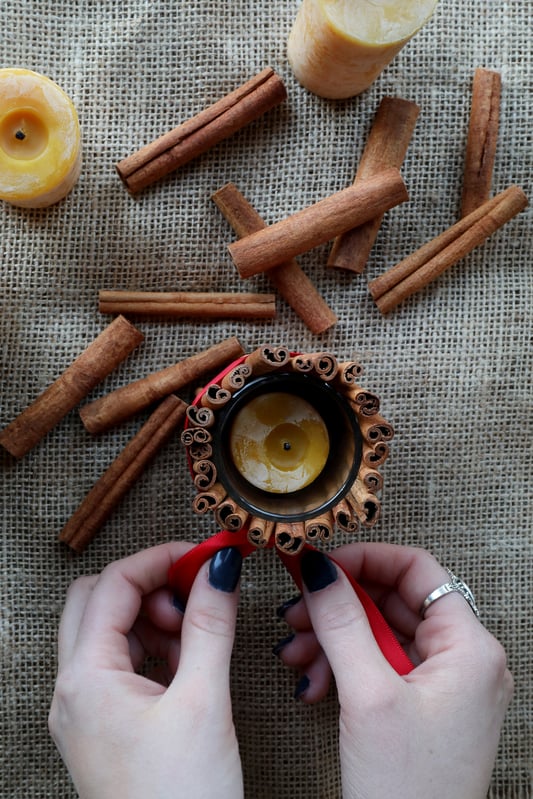
Supplies
- Small upcycled jar that will hold a votive candle, or a simple glass votive holder
- Low-heat glue gun or craft glue that is good with glass/china
- Decorative ribbon or twine
- Votive candle
- Organic cinnamon sticks
- Non-flammable herbs and spices of choice for decorating (Hint: star anise looks lovely with this combination, and adds to the wonderful smell as it heats!)
Directions
- Sort through cinnamon sticks to choose ones that are as long (or longer) as your votive holder is tall.
- Apply a line of glue to the back of first cinnamon stick.
- Press cinnamon stick upright to side of votive holder, lining up so stick is even with the bottom of the holder.
- When glue is dry and cinnamon stick is adhered, glue next stick snugly against it in the same manner.
- Repeat with remaining cinnamon sticks to completely circle the votive holder.
- Wrap with decorative ribbon or twine to further secure sticks and tie ribbon ends into a festive bow.
- You can leave the candle holder simple, or glue decorative herbs and spices to the ribbon.
- When everything is dry, add votive candle to holder.
Pro Tips
- If you are using craft glue, rather than a glue gun, you will need to hold the cinnamon stick in place until the glue adheres—a trick is to apply two or three sticks, and while one person holds them in place, tie a piece of twine snugly around the unfinished candle to keep them there. Then go do something else while they dry and come back later to add a few more sticks in the same manner.
- For a festive table, place the cinnamon stick votive on a plate or board and lay fresh cut evergreen sprigs, pine cones, hops, etc. on the plate around it, away from heat and flame.
DIY Decor Projects for Teens & Adults
This is the part of our crafting day when we brought out the dry moss. Living in rainy western Oregon, I have lots of this helpful crafting tool hanging out handily on the Japanese maples around my patio. If you don’t have moss readily available, you can also purchase or find other options at your local, independent craft store. The moss creates extra support when making wreaths and botanical rings, gives you a perfect surface for adhering glue decorative herbs and spices, and can be used to strategically cover up any less-than-beautiful spots.
Pine cone hanging Wreath or votive centerpiece
This is a pretty and simple project that can be hung on a wall or used as a base for a candle holder centerpiece. With a little finagling and a helpful friend to hold things in place while they dry, you’ll be surprised how quickly you get the hang of it and how easy it is to build!

Supplies
- Pine cones of roughly the same size
- Low-temp glue gun or good craft glue
- Dried moss
- Dried herbs and spices of choice for decoration (Hint: A festive, wintery combination is cedar, white sage, dried hop flowers, and star anise, along with pops of beautiful red lycii or “goji” berries. Whole chilis or bird’s eye chilis, and pink peppercorns also add great red contrast.)
Directions
- Look for the flatter areas around the base of the pine cones—this is where you will apply the glue to stick them together.
- Apply plenty of glue to the flatter area of one pine cone and press another one against it at the same spot, lining up the bases of the pine cones so they’re even. This will create a pine cone “V.” Hold in place until glue dries.
- Turn pine cone “V” over and glue a little moss in the crack between the pine cone and its neighbor. Push moss in and press it down to create extra support and to cover the glue. This side doesn’t need to be pretty, just solid!
- Continue adding pine cones in this manner, one at a time, turning over each time to add supportive moss, until you’ve created a ring with moss on the back.
- Now glue moss to the front in whatever way pleases you, creating a gluing surface for your decorative botanicals and also providing a place to push in herb stems, etc.
- Glue on decorative herbs and spices.
Pro Tip
- Take apart an herb bundle to get some longer cedar pieces.
- Secure a small, battery-powered votive candle in center and secure to a wire base for a rustic tree topper!
Reishi Mushroom Candle holder
Reishi mushrooms have a stunning red-brown natural hue and tend to grow in fascinating kidney or heart shapes. By choosing one that will “stand up” on its own and that has a fairly deep indentation in the center, you can easily fill the center with moss and attach beautiful herbs and spices to create a perfect focal point or centerpiece on a table. If the opening is deep enough, you can even insert and secure a long taper candle to illuminate your creation!
Supplies
- Low-temp glue gun or good craft glue
- Moss
- Twine or ribbon, optional
- Dried reishi mushrooms that will lean on their stem in such a way as to be upright
- Dried herbs and spices of choice for decoration. Good choices include:
- White sage
- Rosebuds
- Bay leaves
- Hop flowers
- Mullein flowers
- Cedar
- Whole chilis
Directions
- The first goal is to create a “shelf” of moss around the mushroom’s center indentation, so that you have something to glue herbs and spices to (they don’t adhere well to the mushroom itself). Glue a moss base around the bottom of the indentation, about an inch wide. Let dry.
- If you are making a candle holder, put in the taper before you decorate to make sure you’ve created enough moss support for it to stand upright. Add more moss as necessary.
- If you are not making a candle holder, glue moss base around the top of the indentation if desired.
- Glue dried herbs and spices of choice to the moss. Add fresh botanicals, twine, or ribbon as you like.
- If you want to further decorate the mushroom, strategically glue down moss first and let dry before you add herbs and spices.
Pro Tips
- If you have difficulty gluing the initial moss base, do it in smaller pieces and let glue dry between applications of moss, so that you build out bit by bit until you have a good inch-wide strip of moss to work with.
- If you make a reishi candle holder, use a little hot wax or old-fashioned candle adhesive in the decorated indentation to hold candle firmly upright.
- Don’t let a candle burn down to the dried botanicals—these can be flammable.
*Happy decorating!*
Looking for More HOmemade holiday inspiration?
Check Out These 10 DIY Gift Ideas
You may also be interested in: