Eating sprouted seeds is a relatively recent culinary trend in the U.S., even though they are ridiculously easy to grow and can be an excellent source of potassium, magnesium, folate, beta-carotene, calcium, vitamin C, and vitamin K. These days, bean sprouts, grain sprouts, and salad sprouts are readily available at farmers markets, natural foods stores, and in the produce section of many grocery stores. But I grow my own because it’s easy to do, saves me money, and I like to keep control over the process to ensure that the sprouts I feed my family are safe and at the peak of flavor and nutrition.
Sprouts have a long history of use in China dating back thousands of years as a nutritional staple. 18th-century sailors also sprouted seeds on long voyages as a source of vitamin C to help prevent scurvy. Modern research supports these historical reports of the benefits of sprouts. Nutritionally, because the seeds of a plant contain all the nutrients required for them to germinate and grow, sprouts have the most nutrients within the first seven days of their growth—almost 20 times more than the same plant when it’s fully grown. So, because we “harvest” our sprouts when they are just a few days old, we capture those nutrients at their peak.
Growing Sprouted Seeds Safely
Growing your own sprouts has a number of advantages over purchasing them at the store or farmers market. It is significantly cheaper to buy seeds and set up a growing area with jars on your countertop than it is to buy sprouted seeds. Also, because you control the entire sprouting process, you can mix and match seeds to add a variety of flavor and texture to your food. And, growing your own sprouts means you can ensure they are grown in the cleanest ways possible, which is key to food safety.
Because sprouts are delicate, they are generally eaten raw or very lightly cooked. As with most raw vegetables, sprouts can be a source of illness-causing food-borne bacteria like E. coli. This potential for harmful bacteria is exacerbated by the fact that sprouting seeds require a warm, wet environment, which is of course also the ideal condition for bacteria.
Growing sprouts on your countertop safely is not a difficult process, but it does require cleanliness and consistency. It is important to exercise some basic precautions:
- Always use sterilized equipment, including jars, screens, lids, etc.
- Always wash your hands before handling sprouts.
- When sprouts are ready to harvest, store them in the refrigerator at all times.
- Always rinse sprouts before consuming.
- Never eat sprouts that smell or that are slimy. *Note that brassica sprouts will naturally smell more than other sprouts.
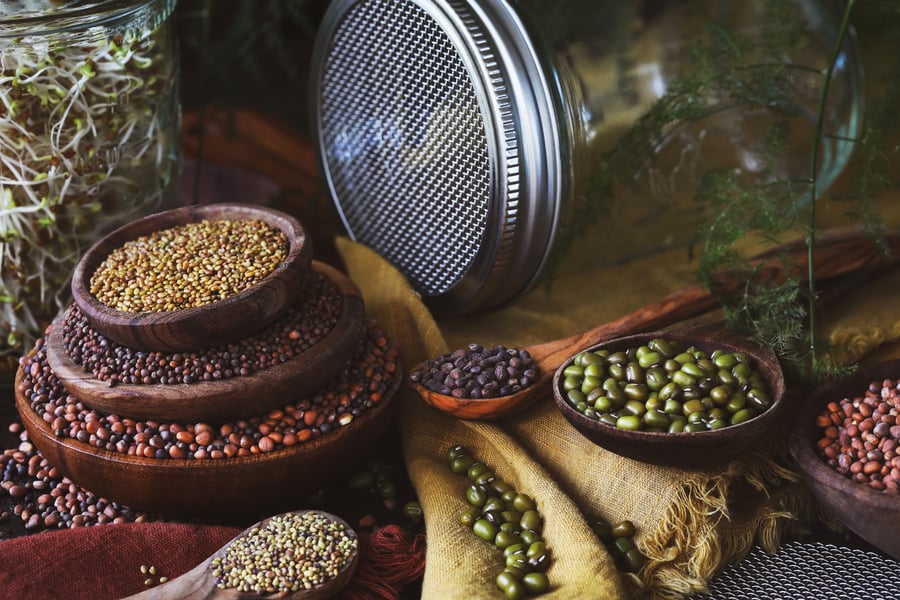
Best Sprouting Seed Types
Some seeds require more maintenance than others. We recommend starting with these lower-maintenance seeds to build experience before launching into seeds with more complex requirements.
Alfalfa: Alfalfa sprouts are another good choice for beginners. They have a mild flavor. Soak for 8-12 hours. Harvest at 5-6 days, when leaves are open and most of them are green.
Broccoli: Broccoli sprouts are mild in flavor and have a light crunchy consistency. They are one of the most popular sprouts in the U.S. Soak for 4-12 hours. Harvest sprouts at 5-6 days when the leaves are open and most of them are green.
Daikon Radish: Daikon radish sprouts have a zesty flavor and pungent kick. Soak for 4-6 hours. Harvest sprouts at 5-6 days when leaves are open and most of them are green.
Mung beans: Mung beans are the most popular sprout in the world and are one of the easiest to sprouts for beginners. They have a slightly sweet flavor. Soak them for 8-12 hours. Harvest at 2-4 days, when most of the beans have short roots.
Mustard: Mustard sprouts are spicy, sometimes with a horseradish-like flavor. Soak for 6-12 hours. Harvest at 5-6 days when leaves are open and most of them are green.
Rambo Radish: Rambo radish sprouts are spicy in flavor and can add a beautiful purple color to dishes. Soak for 6-12 hours. Harvest sprouts at 5-6 days when leaves are open and most of them are green.
Supplies for Growing Homemade Sprouting Seeds
- Wide mouth jar and sprouting screen
- Sprouting screen or cheesecloth
- 1-5 tablespoons sprouting seeds
- Water
- Airtight container for storing sprouts after the process
How to Sprout Seeds in a Jar
Day 1
- Make sure you have clean hands.
- Wash your jar(s) and dry them thoroughly to prevent any bacteria. Choose a jar with enough room to thoroughly soak seeds and leave room for sprout growth. Plan to use at least 2-3 parts water for every 1 part seeds.
- Rinse seeds of choice and pour into jar. If using a pint-size jar, you'll want to add about 2 tsp. of seeds. For a quart-size container, you'll use a heaping tablespoon. Add at least 2-3 times as much room-temperature water as you did seeds (more water is fine); they must be fully covered.
- Use a clean spoon or swirl the jar to stir the seeds and make sure they are all in contact with the water.
- You can leave the jar(s) uncovered at this point, but I put on a sprouting screen now. Leave seeds to soak for the appropriate amount of time (see above). Some seeds absorb more water and will look swollen, while others may look mostly unchanged. Either way, the soaking softens the seed shell and prepares them for germination.
- When soaking time is done, if there are floating seeds, try to push them down into the water to see if they will sink. (Remember to wash your hands before touching seeds!) Skim off seeds that continue to float.
- Drain seeds over a sink either using the sprouting screen as a strainer or pour into a fine mesh strainer.
- Rinse soaked seeds thoroughly with an abundance of cool water. Turn up your faucet to get enough water pressure to separate the seed and make sure they are really well rinsed.
- If you haven't put a sprouting screen on your jar yet, do so now. Turn the jar upside down over the sink to thoroughly drain. Shake the jar, swirl it, etc. to get as much of the rinse water out as possible.
- When no longer dripping (the seeds must not sit in water), set the sprouting jar(s) upside down at a 45° angle propped in a bowl or on a clean, dry towel on your counter away from direct sunlight but where the seeds can get normal light and plenty of air through the sprouting screen. Ideally, keep the temperature in the room around 65-75℉ with little to no humidity. If it is hot or humid, consider putting a fan in the room to keep air moving around.
- Wait at least 8 hours before your next rinse.
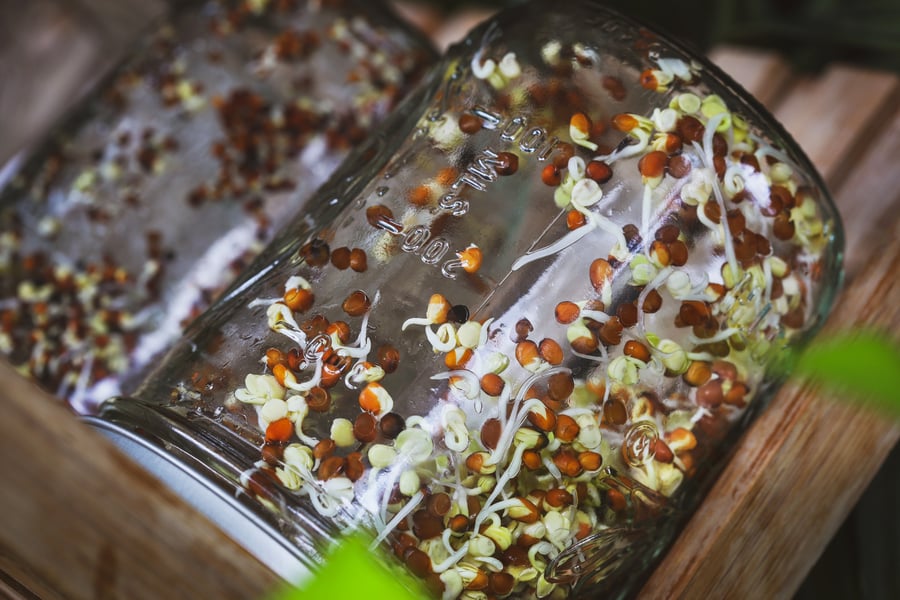
Days 2-6
You must rinse the sprouting seeds 2-3 times a day until they are ready to harvest. Make this part of your morning and evening routine. If it is hot and humid, consider running a fan for airflow and rinse the sprouts 3 times a day.
Follow this rinse-strain-drain process each time:
- Every morning and evening, rinse soaked seeds thoroughly with an abundance of cool water. Turn your faucet up to get enough water pressure to separate the sprouting seeds and make sure they are all thoroughly rinsed. *If it is hot/humid, use cooler water.
- Turn the jar upside down over the sink to thoroughly drain through the sprouting screen. Shake the jar, swirl it, etc. to get as much of the rinse water out as possible.
- When no longer dripping, set the jar(s) upside down as you did on day 1: at a 45° angle propped in a clean bowl or on a clean, dry towel. Change the towel or bowl out each time for a clean dry one to avoid bacteria.
- Some types of seeds will begin to sprout tails by day 2 and others will take longer. See the list above to determine when to harvest, but in general, your sprouts will be ready when they have a 1/4”-1/2” tail and many will have open green leaves.
- 8-12 hours before harvesting, give sprouts a final rinse and drain as usual. Now spread the sprouts out on a dry towel for about 30 minutes to give them time to dry more. Alternatively, you can put sprouts in a salad spinner to release excess moisture. Sprouts must not be wet when stored!
- Store sprouts in a clean, airtight container in the refrigerator. Properly stored sprouts will last up to 5 days. Do not eat if they smell off or they start to get a slimy texture.
Troubleshooting
Although sprouting seeds is a simple process, there are a few ways it can go off track:
- Oversoaking can cause seeds to drown.
- Undersoaking can slow down sprouting time and decrease germination rate.
- Insufficient draining can cause seeds to drown. After rinsing, make sure to get as much rinse water out of the jar as possible. Broccoli seeds are particularly susceptible to drowning.
- Mold can be a problem if your seeds experience high humidity, lack of air circulation, or insufficient draining. Always use sterile equipment, rinse with cool water (never rinse with warm water), drain very well, and supply a fan on days with heavy humidity. Note however that broccoli, radish, other brassicas, and grain seeds have root hairs that appear fuzzy and can be mistaken for mold. When rinsed, root hairs lay down against the main root, but may pop up again as they dry and lay down again when rinsed. These are not mold!
- Bacteria can cause sprouts to get smelly and slimy. Avoid adding bacteria by sterilizing equipment, washing hands, thoroughly rinsing and draining sprouts, and don’t let jars sit in a puddle of water. If you suspect sprouts are going off, compost them, sterilize your equipment, and consider how to improve your system for the next time.
Looking for other ways to live a more sustainable lifestyle?
Bulk Ingredients That Save Money, Reduce Waste, & Promote Resiliency
You may also enjoy:
- Sprouted Chocolate Dessert Hummus
- 3 Easy & Light Summer Salad Dressing Recipes
- Roasted Brussels Sprouts with Garlic Oil and Shiitake Mushrooms